Larry’s “Easy” Whole Wheat Sourdough Bread Recipe

In a KitchenAid mixing bowl add:

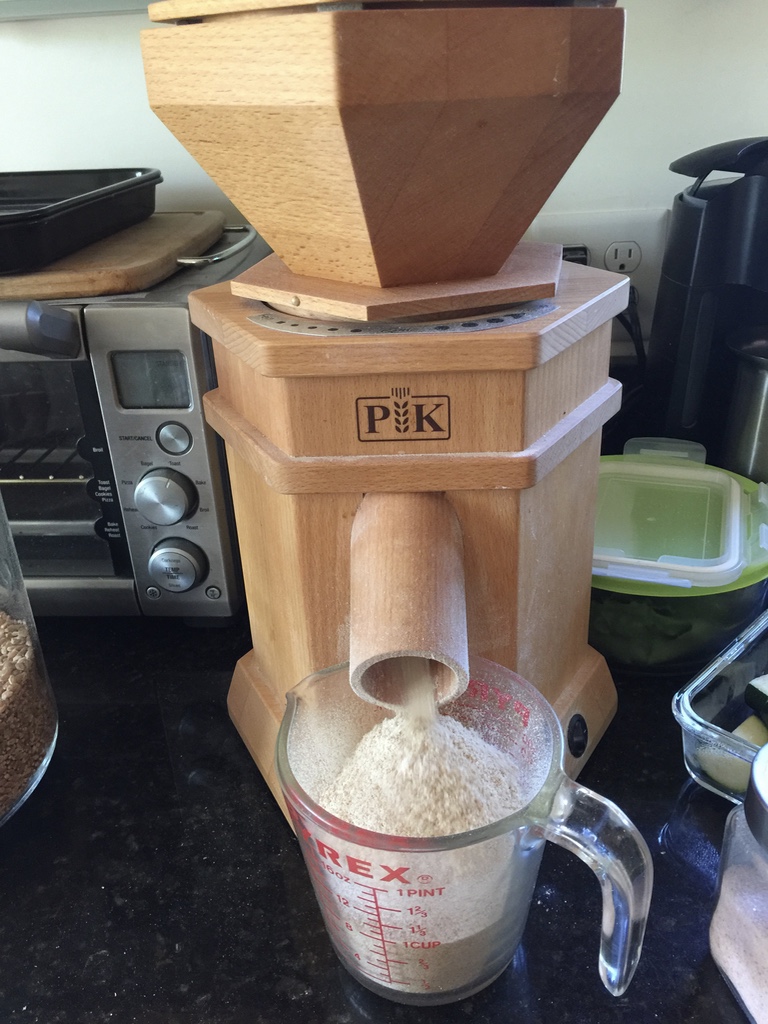
  • 4 cups hard red winter wheat flour (fresh ground from 3 cups of wheat berries)
  • 3 cups Einkorn wheat flour (fresh ground from 2 cups of wheat berries)
  • 4 tsp. of salt

In a 4-cup measuring cup add and stir:

  • 3 cups water
  • 1 cup sourdough starter
Fresh ground flour from wheat berries using our wonderful German PK Mill

Pour the liquid into the mixing bowl. Mix until it with the KitchenAid until it looks “doughy” (perhaps 7-15 minutes). Use a rubber spatula while mixing to keep it off the sides or stop and use it to mix up flour from the bottom into the dough ball.
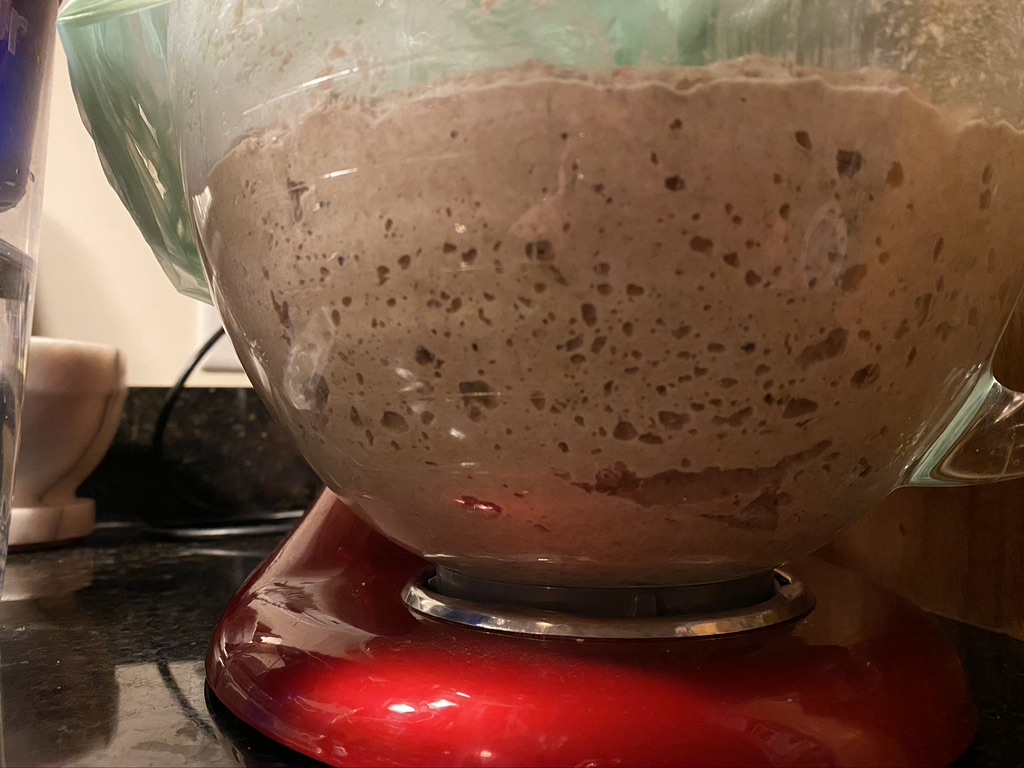
Cover the mixing bowl (perhaps with a re-used plastic veggie bag or damp cloth). Let sit in the mixing bowl out on the counter (perhaps near the oven) overnight.

Nice a spongy sourdough after resting overnight

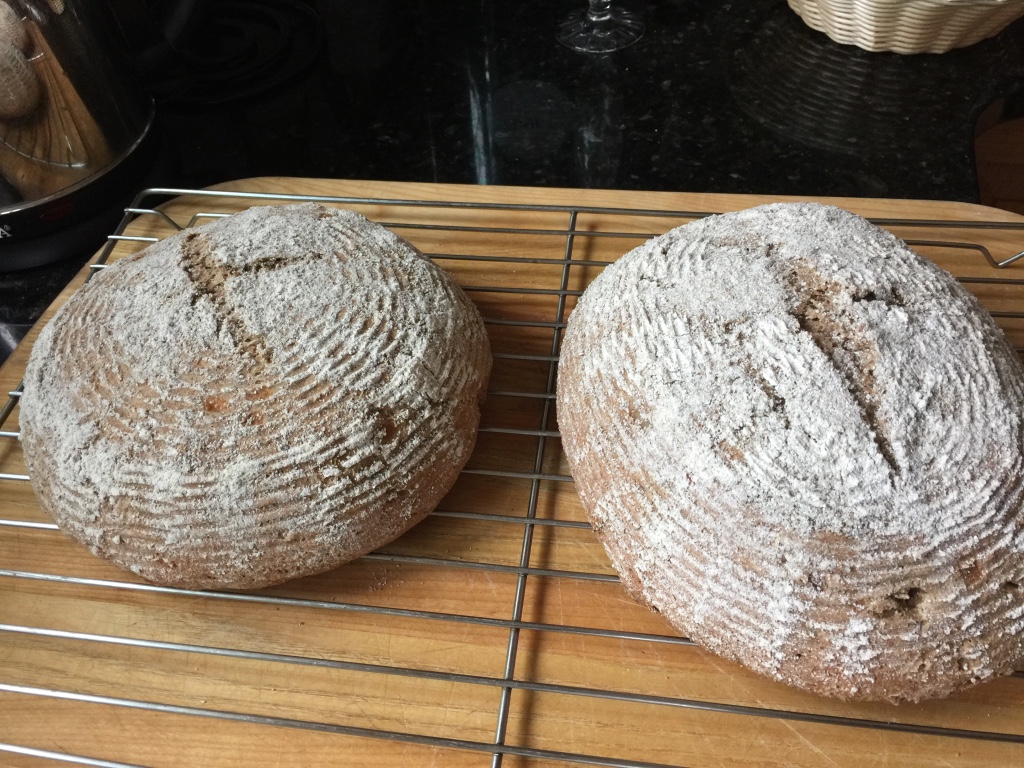
If you want to get fancy you can use a “proofing basket” before baking to give the dough a second rise before cooking. Then you’ll get pretty bread like this:

If you proof the dough in a floured basket, it can look like this!

But we’re going to skip that step to make this easy!

Heat oven to 500℉ with a covered Dutch oven inside. 

Once the oven and Dutch oven are up to temperature:

  • Scrape the mixing bowl gently to get it ready to pour into the pot.
  • Use pot-holders to remove the Dutch oven and close over door.
  • Remove lid from Dutch oven and scrape / pour in the dough.
  • Use pot-holder to place lid back on Dutch oven and place back in oven for 30 minutes.
  • After 30 minutes, remove lid and turn oven down to 350℉.
  • Cook until center of bread reaches 205℉ or about 20-30 minutes when the crust looks golden brown.
  • Remove from oven when done and place on a wire rack to cool for at least an hour.

Then you might get something like this:
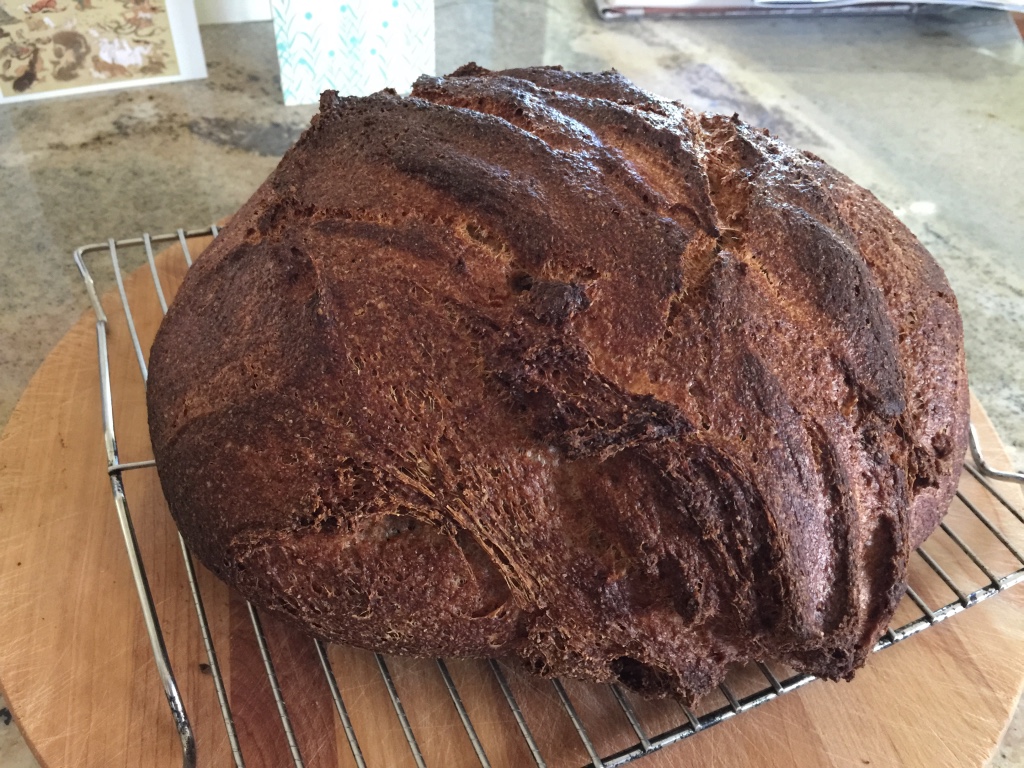
A loaf with character!

Enjoy!

A Metta Prayer

The Pali word “metta” is often translated into English as “loving-kindness”. It’s a Buddhist concept that all of us would do well to embrace. The Urban Dictionary defines “metta” well:

Metta is a sincere wish for the welfare and genuine happiness of all beings, without exception.

Here’s a metta prayer given to me by a yoga teacher at Kripalu. I say it most everyday when I am mindful:

May I be happy.
May I be healthy.
May I ride the waves of my life.
May I be peaceful no matter what I am given.

May we be happy.
May we be healthy.
May we ride the waves of our lives.
May we be peaceful no matter what we are given.

May all be happy.
May all be healthy.
May all ride the waves of their lives.
May all be peaceful no matter what they are given.

“Click Here” Links are a Scourge of the Internet!

I love reading Ivan Levison’s newsletters. But I have to admit to a very visceral reaction when I see anyone advocating click here links or buttons (as he did in his December 2012 newsletter). I think they are a scourge of Internet usability because they require the user to read (and re-read) the text before the link to have any idea what the link leads to. Imagine if every link were done this way. You might get text like this:

To backup your files, click here. To view your files, click here. To delete your files, click here.

Compare the usability of that to this:

You can back up your files, view your files or delete your files.

The second option is better because:

  • It is more compact.
  • The links are more useful and much less ambiguous.
  • The links will improve SEO because they include relevant text.

Now, I understand the “imperative magic” of “click here” (probably from reading one of Ivan’s newsletters and other research I’ve seen). But that doesn’t mean we can’t try a little harder and be a little more creative (and effective) with our imperatives. There are plenty of free HTML button maker sites and other inexpensive dedicated button maker programs out there.

The take-away message for today… The Internet would be a better place with more Buy Now!, Read Results and Delete Files and fewer Click Here links and buttons.

My two cents. 🙂

How to send Ctrl+Alt+End to a Windows Remote Desktop Session

I recently was stymied when I needed to send the Ctrl+Alt+End keystroke to a Windows Server 2008 machine that I was remote desktopping to via Internet Explorer running on Windows 7 using VMWare Fusion on my MacBook Air running Mountain Lion. Phwew! That’s a mouthful.

The first problem is that there’s no End key on the Mac keyboard. VMWare can send Ctrl+Alt+Delete from a special menu, but that gets caught by Windows 7. I needed to reset my password on the server (or get locked out) and needed to use Ctrl+Alt+End. Here’s the magic Mac keyboard combination:

fn-ctrl-option-rightArrow

Works like a charm!

Amazing Bean Soup

Like folk music, cooking borrows inspiration from all over. This recipe was an attempt to clean out my pantry and refrigerator before moving into a new house. It was inspired by the Hearty Vegan Navy Bean Soup by Meghan but evolved into something uniquely Larry. You can throw this delicious soup together in 30 minutes.

Yields: 4-6 servings

3 tbs. balsamic vinegar
1 small yellow onion, chopped
3 cloves garlic, minced
1 carrot, diced
3-4 tender celery stalks with leaves, chopped
4 cups vegetable broth (or water)
1 15 oz. can cannellini beans (or some other light-colored bean, unrinsed)
1 15 oz. can kidney beans (or some other dark-colored bean, unrinsed)
4 oz. smoked tofu, diced
1 bay leaf
8 oz. tomato sauce (or puréed tomatoes)
¼ tsp. ground ginger (powder)
¼ tsp. mustard powder
¼ tsp. chili powder
¼ tsp. black pepper
¼ tsp. thyme
½ tsp. parsley flakes
2 tbs. fresh cilantro, chopped (optional)
¼ tsp. salt
  1. In a non-stick Dutch oven or other medium saucepan, sauté onion in balsamic vinegar until it carmelizes.
  2. Add garlic and continue to sauté. Then add the celery and carrot. Add more vinegar as necessary.
  3. Add all the other ingredients to the pot. Simmer 30 minutes, stirring occasionally.
  4. Remove bay leaf before serving.

Be prepared to dish up seconds… It’s that good!

Flying Dark Pumpernickel

I’ve often made the dark pumpernickel bread from Donna Rathmell German’s excellent The Bread Machine Cookbook. It’s good, but not as good as the pumpernickel from When Pigs Fly Bakery. And I think I’ve figured out the difference. I tweaked Donna’s recipe a little and then added some fennel seeds for the special flavor I was looking

I rarely bake bread in my bread machine. I just use it to knead the dough. Then I form it into dinner rolls, let them rise and bake. This way you can have fresh backed bread from scratch on the table in under two hours.

Yields: 12 generous dinner rolls or one large loaf

1 tbs. yeast
3 cups whole wheat flour (e.g. King Arthur’s White Whole Wheat)
1 tbs. caraway seeds
1 tsp. fennel seeds
1 1/3 tsp. salt (we always use sea salt when available)
1 ½ tsp. instant coffee granules
1 1/3 tbs. brown sugar
2 tbs. unsweetened cocoa
   
3 tbs. vegetable oil
4 tbs. molasses
1 1/3 cups water

Here a couple of other tricks that make the process easier:

  • If you measure the oil in the measuring spoon just before you measure out the molasses, the molasses doesn’t stick to the spoon.
  • When the bread machine firsts starts kneading the dough, you have to watch it and adjust the amount of water (or flour) to get the proper texture for the dough. Make sure it sticks together as a nice round “ball”. If you can still see pieces, add water; if it sticks to the sides, add flour.
  • To make rolls, when you take the dough out, put it on a cutting board that has been dusted with some cornmeal, cut the dough in half and roll each half into a “log” on a cut. Each log will make six rolls, so slice the log in half, then slice each half in thirds. Now for the best part, to form the rolls, simply “pinch” one of the cut sides together. Since they should be a little wet, they will stick together like magic. The other cut side makes a lovely pattern when they rise.
  • Let the rolls rise in a warm place for about 20 minutes before baking. I usually put them on the stovetop while the oven is preheating. In a pinch, you can just form them and shove them in the oven. They’ll be fine!
  • I usually preheat the oven with a baking stone in it at about 25-50 degrees hotter than needed. (E.g. I heat the oven to 425 if I plan to bake at 375.) Once I put the rolls in, I turn the oven down to the desired temperature. I believe this gives the bottom of the rolls a nice crust and doesn’t cause the oven element to come back on right away for nice even cooking afterwards. I usually bake the rolls on the top shelf for 15 to 20 minutes (depending on how hungry I am and how good they smell).

Cashew Chili

The first time I ever had cashew chili was back in the late 1970’s at the Moosewood Restaurant in Ithaca, New York. I’ve never forgotten just how good it tasted and how a simple twist can change a meat-based classic into something deliciously vegan.

I’m not sure if this is the recipe the Moosewood chef used, but it works for me (with inspiration from 150 Vegan Favorites by Jay Solomon). This recipe is also great to make in a crockpot and bring to your next pot luck dinner.

Yields: 6-8 servings

1 tbs. canola oil
1 small yellow onion, diced
1 red bell pepper, seeded and diced
2 large cloves garlic, minced
1 large jalepeño or serrano chili pepper, seeded and minced
1 cup cashews, (pieces or whole; roasted, unsalted if available)
1 28 oz. can crushed tomatoes
1 15 oz. can red kidney beans (no need to drain or rinse)
1 14 oz. can stewed tomatoes (sometimes we find them with adobo seasoning)
1½ tbs. chili powder
2 tsp. ground cumin
½ tsp. ground cayenne
½ tsp. salt (we always use sea salt when available)

In a medium saucepan, heat the oil over medium heat. Sauté the onion, bell pepper, garlic and chili pepper for about 5 minutes. Add all the spices and stir them around until they are well integrated into the sauté. Add all the tomatoes and beans, reduce the heat to medium low and cook for about 15 minutes, stirring occasionally. A few minutes before serving, stir the cashew pieces into the chili – their late arrival helps to keep them nice and crunchy when served (although I doubt anyone will complain when they warm some up the next day 😉

Serve in bowls with some nice corn bread (perhaps with sweet corn nibblets and minced red and/or green hot/or sweet peppers stirred into the batter before baking). Enjoy!

Larry’s Edamame, Corn, Bean Salad

I made up this recipe today for a potluck I was going to. Of course, the inspiration for this salad is the classic corn, bean salad made with a vinaigrette dressing. But lately I’ve been on an edamame kick, so I just HAD to put some in here. Once I did that, the idea of a vinaigrette just didn’t seem right. Then in walked Deeply Roasted Sesame Dressing – a marriage made in heaven.

Yields: 12–16 servings

16 oz. organic shelled edamame (blanched shelled soybeans), frozen
16 oz. organic sweet white (or yellow) corn, frozen
30 oz. organic black beans
1/4 red onion, minced
3 tbs. fresh chopped cilantro
8 oz. smoked tofu (e.g. SoyBoy), diced fairly small
6-8 oz. Deeply Roasted Sesame dressing (e.g. Kewpie Deep Roasted Sesame (at my local River Valley Co-op) or Deeply Roasted Sesame (Japanese Style) Dressing Marinade (from Cindy’s Kitchen available in Whole Foods near the lettuce in the refrigerated produce section))

Now for the easy part. Rinse the frozen veggies in warm water to remove any freezer ice. Rinse the beans. Put all the ingredients into a nice serving bowl, mix it all together and let the flavors blend (in the refrigerator or cold garage during a New England winter) for at least an hour before serving. Then dig in!

I would consider adding a little diced red pepper for color next time. Experiment, play, let me know what works for you.

Lessons Learned Code Signing a Visual Studio 2008 .MSI Setup Project

I thought my mission was an easy one:

Code sign an existing MFC application (Metafile Companion) setup installer

I should have known better. 🙂 I was successful and it really isn’t that hard once you find out what to do. But there’s the rub – the web is full of options that end up being dead ends. Below are some of the lessons I learned.

Lesson 1: You really can pay $99 for a one-year signing certificate from K Software.

There are other more expensive Certificate Authorities (e.g. VeriSign and Comodo) that charge more than this. But the K Software certificate (issued by Comodo) seems to work just fine. I would recommend using either Firefox or Internet Explorer to place your order and later downloading your certificate so it is added “automagically” to the system certificate store. Also, follow their export instructions so you have a backup of your certificate.

Lesson 2: To see what certificates are on your system, run “certmgr.msc”. 

This is how you can be assured that your certificate was properly stored on your system.

Lesson 3: The MSDN article “How to: Sign Application and Deployment Manifests” doesn’t apply to older MFC / VC++ projects.

While this might work for newer C# projects, for my older MFC / VC++ application in Visual Studio 2008, it doesn’t. So don’t try to hard to find options that aren’t there.

Lesson 4: The SignCode utility is “obsolete”; use SignTool instead.

SignCode has a nice wizard mode, but it doesn’t show you a corresponding command line for the options you choose. SignTool is command line only, but is the current tool.

Lesson 5: Add a call to SignTool as the PostBuildEvent property for the Setup project.

Once you figure out all the options you need, adding the event is easy. Here’s what I used for my project:

signtool sign /a /v /d “Metafile Companion” /du http://www.CompanionSoftware.com/ /t http://timestamp.comodoca.com/authenticode “$(BuiltOuputPath)”

You can read the documentation for what the various options are. One time-saving thing is the “/a” option which automatically uses the “best” signing certificate it finds in the store. If you only have one, there this works like a charm. A while back, I had added a “self-signed” certificate to play with. I had to remove this (using CertMgr.msc) to get my purchased certificate to be the “best” one.

I hope these lessons help anyone else that might be trying to do something similar!

An Old Friend Returns from the JanSport “Hospital”

My JanSport backpack and I have travelled everywhere together – all across the United States, Germany, Scotland, Italy and right here in lovely Sunderland, Massachusetts. I use it a lot as a ride my bicycle around town to do work and run errands.

I often throw a laptop, a few folders or some boxes to be mailed into my backpack and pedal wherever I need to in our little town. So I was quite sad when the zipper on the pack started to give way. After a while, it could no longer be trusted to hold everything reliably. What to do?!?

Go out an buy another JanSport backpack, of course! I loved my old one, so I went online and found a new one similar to it. I couldn’t find my favorite burgundy color, so I settled for green (my other favorite). It arrived quickly and looked great. As I was unpacking it, I noticed that the JanSport information said simply that all JanSport backpacks come with a lifetime product warranty. So I figured, why not see if they would fix my old one.

This is where JanSport really surprised me. Not only did they make it incredibly easy to send back my old backpack (e.g. no receipt required), they also went above and beyond in fixing the pack. I only reported a problem with the zipper. But they noticed that one of the buckles was broken and replaced it. And they put new pull cords on all the zippers. My old friend is as good as new. So now I can choose burgundy or green, depending on my backpack mood. Thank you, JanSport. You are amazing!